¶ Overview
The editor is a feature-rich page for writing and organizing individual lists. The page shows all lists in a hierarchical view that allows folders to be expanded/collapsed. A separate file explorer view shows the user home directory, and provides file management tools for creating, copying, moving, renaming, and deleting lists & folders.
The list editor window provides typical text editing capabilities. A list can be searched, edited, and linked. There are visual editing aids available that are typical of code editors, including color highlighting of markup sections, and expanding/collapsing sections.
A search frame provides the ability to search all lists for keywords. It is also possible to narrow the search to certain sub-folders.
Authoring tools provide useful aids that help in understanding the way lists are linked together, and all of the list locations where a specific variable is located. These tools include descriptions of all lists and their linking relationships, all variables and their definitions & references, and conditional branch paths involved with variables.
The text output pane at the bottom of the page shows the results for the searches or authoring tools features described above. It also shows any problems that might result from the error checking pass.
¶ Components of the Editor Page
¶ List Browser
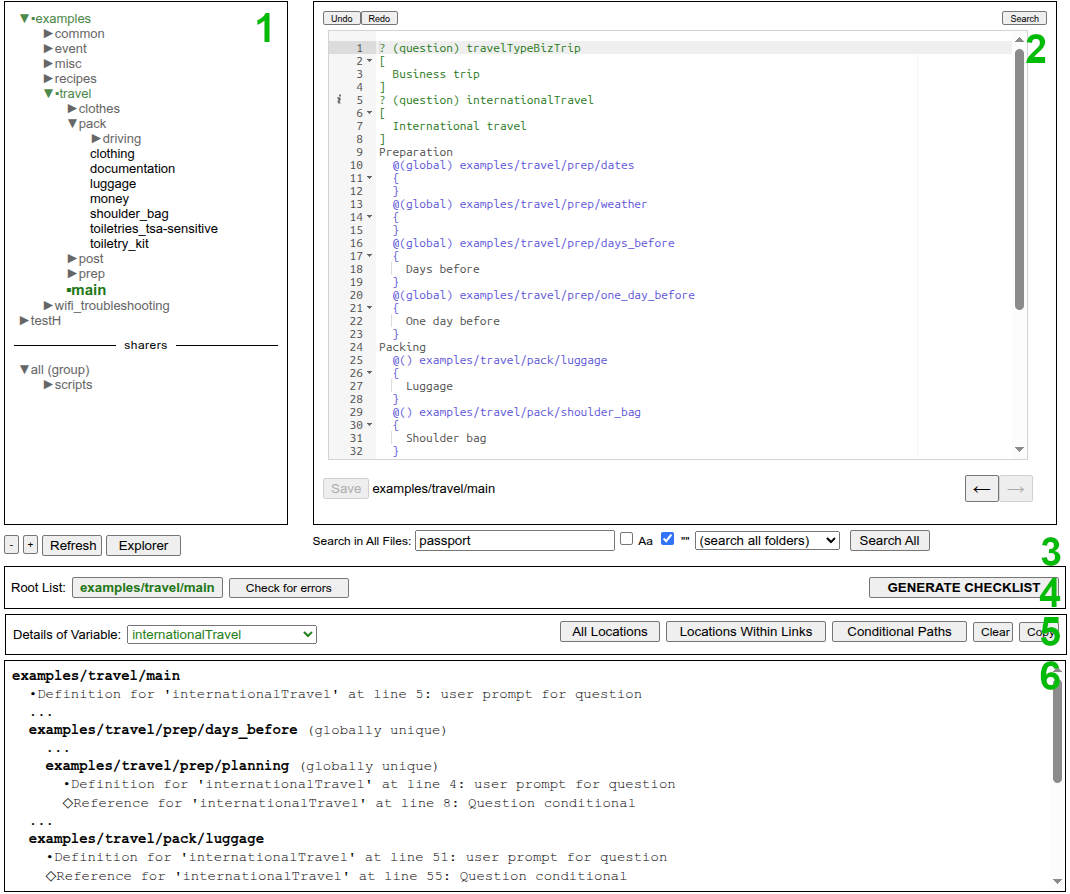
The browser pane1 gives a full display of the home directory with a collapsible view for each folder. Clicking on a folder name will expand/collapse it in the browser, while clicking on a list will open it in the editor pane2. The currently-opened list and its parent folder(s) are marked with • . The +/- buttons below the pane will expand or collapse all entries. If necessary, the Refresh button can be used to re-generate the full listing.
¶ List Explorer
The home directory can be browsed in more detail by clicking the File View button, which will switch to a list explorer view, as shown in Figure 2.
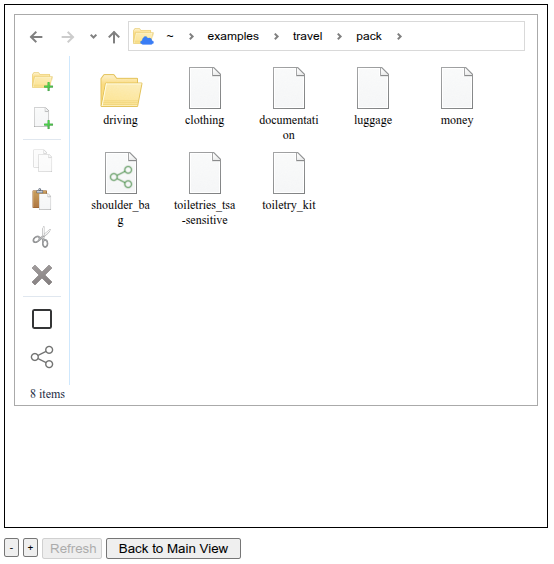
The top of the view shows a clickable path to the current folder (~ is the user's home directory), along with back/forward/up navigation buttons. In the left margin are buttons for various explorer functions.
This explorer view is where new folders or lists can be created, using the folder+ and file+ icons. A single icon can be clicked once to select. To make a multiple selection, a box can be drawn around icons or clicking the lower-left corner box allows multiple items to be checked. To create a copy of the currently selected item(s), first click the copy icon, then the paste icon, and finally CTRL+V (or right-click-paste) in the temporary box that appears. Moving an item(s) is done in the same way, but using the cut icon instead. Highlighted item(s) are deleted using the X icon. To rename a folder or list, highlight its icon, then click again in its name text below it. The name will be highlighted, allowing a new name to be entered.
When a list is renamed or moved, all of the lists are searched for any links that reference it. If any are found, then they are automatically updated with the new name/location.
¶ List Editor
The editor pane2 in Figure 1 shows a list open in the editor.
Syntax Highlighting
This example shows prompt tags in green, a question branch tag in yellow, and list links in blue. Not shown is an assignment which would be highlighted red. See the syntax page for more information on these types of markup tags. Basically, only black text will be seen in the final output checklist.
¶ Expand/Collapse Sections
At the start of each bracketed section, there is a small arrow in the left margin. This allows entire sections to be collapsed or expanded for easier visualizing of the sections in a list. Also in the left margin are icons for search hits or error markers. In Figure 1, the first search result in the bottom pane6 is listed at line 5, which is marked in the editor with an icon.
¶ Keyboard shortcuts
| CTRL+F | Open find / search & replace dialog |
| CTRL+Z | Undo |
| CTRL+SHIFT+Z | Redo |
| CTRL+D | Delete entire line |
| TAB | Indent a line by 2 spaces (or multiple highlighted section of lines) |
| SHIFT+TAB | Un-indent a line by 2 spaces (or multiple highlighted section of lines) |
Buttons
Above the editor at the upper-left corner are Undo and Redo buttons (also CTRL+Z and CTRL+SHIFT+Z). If clicked, the Search button in the upper-right corner will open a dialog box for searching within the currently-open list. In addition to case and word-only filters, there is also an option to do a search & replace operation. The currently opened list name is shown in the lower-left corner, as well as in the browser pane1. Click the Save button to save the file at the server (during editing all other controls are disabled until the changes are saved).
The left/right arrow buttons below the editor allow the user to jump backward or forward within the edit history. Another way to jump between files is to use the list link hover-over popup link. When the cursor is held above a blue list link header line, a popup link will appear. If clicked, the list it links to will be opened in the editor.
¶ Search in All Files
The Search-All pane3 contains controls for searching for text in all of the lists in the home directory. The checkboxes can limit a search to be case-sensitive and/or full-word match. If the drop-down menu is used, a search can be limited to only within a specific folder in the home directory. Search results will be shown in the text pane6 at bottom. Clicking on a search result will jump to the specific line in that list.
¶ Root List
The Root List pane4 is used to specify the “root” list or starting list. This is the list where a checklist generation process begins. In theory, a checklist can be generated from any list, as long as the variable references it contains can be resolved (Variable Ordering). For example, the travel/main list is intended to be a starting list for any type of travel. One of the many lists that it links to is pack/clothing, which if desired could be set as the root list to generate a checklist to be used only for packing clothes.
The currently-selected root list is highlighted in green in the browser. Clicking the Check For Errors button will run the parser to look for any errors in any of the lists linked-to from the root list. Clicking GENERATE CHECKLIST will open the checklist generation page, which is designed for a mobile display (but can be used in any setting).
Any list which has previously been set as a root list, or which has been the start of a generation process, is marked as a known-root list in the editor. These lists are shown in bold in the browser pane1, and are marked with an arrow icon in the Explorer view. These known-root lists are also shown at the top of the generator page in the “favorites” section. It is important to note that the known-root status does not inversely apply to other lists. It is always possible that a list not marked as known-root is capable of being root (but hasn't previously been generated).
If desired, known-root status can be removed from a list in the sharing dialog.
¶ Authoring Tools
The Authoring Tools pane5 contains helpful tools that show how lists are linked together, and how variables interact in the lists.
If no variable is selected in the drop-down menu, then the only option is to select Tree of List Links, which will show how all lists are linked in a tree view.
The other tools are available when a variable is selected. Each of the following tools will show all of the variable definitions (prompt or assignment) and references (conditional branch or assignment):
- All Locations: provides a summary list of all locations for the selected variable. As with all results in the bottom pane6, clicking on a line will jump to the specific location in the editor.
- Locations Within Links: Similar to All Locations, but shows locations within the abbreviated Tree of List Links view, in order to show where these variable definitions and references are in relation to the entire linked list structure.
- Conditional Paths: Shows a tree path structure of where each definition or reference is located within the conditional branches, as they flow to create individual possible paths based on user choices. This is useful for fixing variable ordering problems.
The Clear button clears the contents of the bottom pane6, while the Copy button will copy its contents to the clipboard, where they can be pasted into any text editor, which may be useful for examining detailed output.
¶ Typical Editor Workflow
- A new list usually starts from a written version, an outline, or at least a rough collection of items. A new list file can be created in the list explorer, as well as a new folder in which to place it, if desired.
- Branches for conditions can be added as needed during the writing of a routine, or they can be added later.
- The decision to break a list into smaller sub-lists might happen for a number of reasons: the list may have grown to be too long, part of the list may be used in more than one place (in the same or other lists), or a section of the list naturally breaks into a separate category. Breaking up lists helps to keep things organized by grouping tasks that must be done all at once, fall under the same objective/purpose, or that deal with the same subset of a routine.
- As discussed above, it is necessary to select a root list as the starting point of the checklist generation process. Any list can be selected as the root list, although this is not done very often. Selecting a different root list will result in a different parsing path through the lists, and potentially different error messages (if there are any).
- As long as a root list has been selected, an error check may be performed at any time while writing. Since markup tags are a written language, it is common to unknowingly create an error that will need to be fixed before checklist generation is possible. Periodically checking for errors while writing is good practice, but it is also possible to write a full set of lists for a routine before running the error check. The troubleshooting guide explains errors that commonly pop up, and how to fix them.
- When any errors are resolved, the checklist generation process may begin. The checklist generator can be accessed by clicking GENERATE CHECKLIST. The generator page is optimized for mobile use; it is designed to be used in the field, when the user is going to perform the routine. However, this page works fine in a laptop/desktop browser, which is where the list editor page is designed to run.
¶ Future Improvements
Hover-over hints or "tooltips"
Hovering the mouse over certain markup elements will display a pop-up dialog with helpful hints or shortcut actions.
Automatic insertion of markup tags
This feature will allow a user to select a prompt, branch, or assignment without having to remember the exact syntax to type. Selecting one of these options from a menu will cause the text to be automatically typed into the editor, along with corresponding indents, etc.
Additional visualization tools
The authoring tools that are currently implemented allow the author to see how all lists are linked together, where variables are defined and referenced, and where variables exist in the spectrum of possible decision paths through the lists. Other helpful visualizations will be provided. One of these will be a graphical representation of all paths in a flowchart form. Another is a dynamic preview of the full list which continuously regenerates as answers to prompts and assignments are given, allowing the author to perform a “test run” of the lists in a routine to verify that the outcome is as expected.
Possible mobile-friendly interface
The complexity of writing and organizing lists naturally make a laptop/desktop environment the choice for editing. However, the possibility of a mobile-friendly interface for simpler edits will be explored.